I am very pleased with the result of my baby hammock!! It was so much fun to make and not at all difficult, once I figured it out that is. I hope that my tips that I am including will help save you time and be helpful.
Sewing the baby hammock gave me an opportunity to think about my third baby and spend some time with him/her in my mind. I am more excited then ever to have my baby hanging from the ceiling beside my bed while I sleep the whole night through!!! Well, maybe not the whole night, but most of it? The baby hammock is supposed to help them sleep because when they move they bounce and sway a bit while the narrow base cradles their little bodies as though they are being held. This is supposed to help with colic as well. Not that I mind holding my babies but I prefer to sleep during the night and cuddle during the day!!

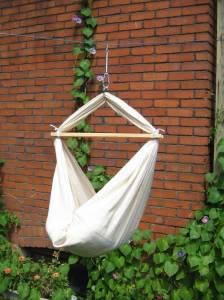
Of course I will not be hanging my baby from the cloths line but it was the best place I could come up with to take it’s picture.
I will place a Kushies change pad over the futon as my sheet. I just love Kushies change pads as they are easily folded up with one hand, they take little space in my diaper bag, they are long, and they have a “water” proof backing and it will make for an excellent futon protector!

This is what you need:
*3 meters of unbleached muslin
*One 6 inch sturdy spring I found at, “Canadian Tire” in the section with ropes, chains and hooks.( Make sure the spring has a closed clasp at the top and bottom.)
*one steel ring
*one to three carabiners
*one or two quick links ( Jason just said it is used to attach two pieces of chain together) (Note, the quick links did not leave a large enough opening to attach the ceiling hook so I ended up using carabiners instead) Quick links are cheeper so if you had the right size I am sure you could make them work.
*a pine board 1″X 3″X 4feet Jason cut it in half so I have two boards for two hammocks. I sanded the edges and filed it to make it feel nice. – Jason drilled a 1″ hole at both ends then he cut out a piece to open the end up which allows the fabric to be pushed into the hole. ( Ties hold the board in place) If you look closely at one of the pictures above you will see how it was done and you will notice that there are also two holes drilled at each end as well. This is because I was/am thinking of threading the ties through the holes to hold it better in place. Right now the holes are not big enough to allow my bias tape to go through. (Note with very little effort I did thread the bias tape into my holes, amazing what can happen when I try.)
(One more thing to add about the wooden board is the actual measurement of the board is 2.3/4 wide, 3/4 thick and 2 feet long but the measurement at the store was 1x3x4. For some reason they don’t label wood with it’s actual true measurement.)
* A hook( I think it was close to two inches going into the stud ) to be installed into the joist of the ceiling by someone who knows what they are doing, like Jason!!
* and a length of chain so you can adjust the height of the hammock
O.K this is what I did.
I used 3 meters of unbleached muslin because according to my friend who is American and lived in New Zealand where my inspiration came from Natures Sway Baby Hammock but is in Canada now, calico is the same thing as muslin in Canada. It is strong and has great ventilation. It was 44 inches wide and I did not hem it.
I put a steel ring on the fabric then made sure the fabric was not twisted and sewed the ends together with a french seam. ( First I put the ring on then thought, “No I will use a carabiner instead of a ring that way I can take it off to wash and won’t have a steel ring banging in the washer” So i took it off. I then discovered that I could not thread the fabric through the carabiner and had to rip out my seams. This took me at least an hour because I was careful not to cut the fabric and muslin is not fun to seam rip. So while I took the seams out I decided to use coloured thread so any more seam ripping would be easier to do and I was more cautious about sewing to avoid the tedious task.
Then I folded it in half and measured 14 inches from the bottom, marked and pinned a line, and sewed two seams side be side ( a double needle would have been nice right around then), then I folded the 14 inch flap over and sewed that seam down twice.( basically I sewed a 14 inch french seam) This way there are three layers of fabric at the base of the hammock. It took me three day’s to figure out the easiest way to do that. I wanted all the seams at the bottom so the seams would not interfere with the ring at the top and I did not want to do any more seam ripping if I made another mistake. So It took me some thinking. I also wanted it to look as close as I could to the Natures Sway baby hammock.
After I had the bottom in, I measured again from the top 13 inches down each side marked and sewed a tie on the outside center of the fabric. My tie is made from bias tape. I wish i had a nice colour tie to match my thread but all I had was white so… This is where the wood will sit and be tied onto.
Now for the futon.
It is made with cotton sheeting( sales woman at the store said it was factory cotton) It doesn’t matter what you use just make a 14 “x 34 ” casing and fill it with 1 inch foam. I used an old pillow that was not being used which worked perfect!!. Then I tied three rows of knots down the center so the edges of the futon will be higher than the center, cradling the baby better and making it more difficult for him/her to roll over. Pretty smart, ah? ( It should be a quilters knot so the knots will not loosen or come out. I would love to tell you how to do that but I don’t think mine are right so you will have to find this somewhere else)
After I had everything in place I added two snaps to the head and feet of the hammock and one snap to hold the ring in place at the top to steady it. I am thinking seriously about adding a button up there instead of the snap or adding another snap.
There you have it your very own baby hammock. And I think it looks very professional if I do say so myself. What do you think? My moms reaction was,” So basically you have no space in your house so you’re going to hang you baby from the ceiling?”
“Yup, that’s pretty much it”
I would love to hear about your own baby hammock that you make, especially if you use the method that I detailed. So leave a comment or add any sugestions to help others when making their own hammock.

Wow Karen…I’m impressed! Wish I had this for Caleb…he is still in our bed (in a co-sleeper bassinett but it’s getting a little cramped)! You are a very motivated person…your kids are lucky to have you as their mom. Can’t wait to hear the good news…do you know what you are having?
LikeLike
Wow that is very cool. I am thoroughly impressed. I’d love to make one but I don’t know how I’d ever find the time right now. I’ve got baby #2 on the way and due date fast approaching!
LikeLike
hay cool, It turned out realy nice i can not waight to see a tiny littal babby in there bed. It makes me excited to come out and help you out with your baby. I am thankful i will be able to enjoy the arival of your 3rd with your family. Remind your husband to cheack flights for me if he has time. i have been obsesed with home schoole and fall cleaning the last couple of weeks:)
LikeLike
Awesome hammock and directions! Thank you for sharing your sewing techniques!
LikeLike
Pingback: Boulevard Designs - Just another WordPress weblog » Baby Hammock
Thanks for posting this! I can’t afford to purchase a baby hammock and these directions are exactly what I was looking for!
LikeLike
I have just spent the last few hours trying to find exactly this! I live in NZ and quite liked the Natures Sway hammock but decided i could also do it myself (and save lots of $$). Thanks so much for posting this!!
LikeLike
Thanks so much!!!
Hamilton, ON
LikeLike
How heavy can the child be in this?
LikeLike
Other hammock sites say about 22lbs/10kg.
LikeLike
I meant to ask you about the hammock, what a great idea, I didn’t ever think about the fact that is makes the child feel held. I may look into making one if we get pregnant again.
LikeLike
Looks great but I can’t understand your instructions 😛 very humorous though, congrats on the bub!! 🙂
LikeLike
You don’t know me but I just have to say thanks for sharing about your hammock. I’ve been looking everywhere for something simple that doesn’t take up a ton of room. My husband and I put together a hammock-swing-bed for our 3-month old daughter yesterday and for the first time ever, she napped during the day without us holding her. She’s in there again today. This was the light at the end of this phase of our sleep tunnel so I can’t thank you enough. It’s so easy but I needed the inspiration to get me going.
LikeLike
Thanks so much for the amazing tutorial! You just saved us $250!!! Here is a link to a thread on Hyena Cart Forums where I am showcasing the hammock that my hubby and I just made!
http://hyenacart.com/phpbb/viewtopic.php?t=118235&highlight=
LikeLike
Wow! Thanks for being so helpful! Me and my roommate are both pregnant and we live in a trailer so there is no room with our kids already! this makes it so much better! Thanks for the great directions!
LikeLike
My very clever friend has made a beautiful hammock, and bought a second hand jolly jumper for all the mechanics and made a hammock to fit. She’s loved using it for her daughter, and I’m going to try and make a hammock as well. The ends of the main plastic pole have holes in the end, to which she attached quick links and a short length of chain in a loop. So the hammock is constructed a little differently.
LikeLike
could you post a picture, or give a little more detail as to how the hammock is different than this one? I am making a hammock, and have a second hand johny jump-up…. so it would be perfect.
LikeLike
I’ve followed your instructions and made a beautiful hammock, thank you! I’ll post pictures on my blog soon. But I am struggling with the mattress. Do you mean you filled a pillow case with foam? Does it need to be quite firm?
LikeLike
Julia, thank you for your comment, I am so glad that you you found my instructions helpful. As for the futon. It does need to be relatively firm as you do not want your baby too snug and curled up. Your baby’s head must be off of it’s chest the same rule of thumb for when she is in a car seat or sling… on that note mine was made from the stuffing of an unused pillow. And I ended adding a small blanket under her head to level her out a bit better. I don’t know if that helps or not. you probably finished it by now..
LikeLike
working on making this hammock for babe #3…no more room at the inn so time for the ceiling! a question we have is regarding the mattress. The one I made (using folded and sewn together layers of wool blanket) seems a bit soft and am worried that it would be too squishy for babe. also noticed on the nature’s sway site that they have added a “mattress firmer” for young babes which I am thinking must help with this softness….what was your experience. My mine concern is the chance of suffocation with head turned to the side into a matress that is slightly tucked up around babes head…if you have some thoughts i’d appreciate it..otherwise thanks so much for this post..we are loving this project!
LikeLike
Good post I feel hammocks do add value to a home. I liked the blog and will add to my RSS feed
LikeLike
Hi Karyn! Thanks so much for these instructions – we made one for our baby (now 5 months old) and it’s been great! The hammock hangs above the foot of our bed so we can just give it a kick if needed in the night. Thought I would add some things we did: 1. We bought the spring from the NaturesSway website because we couldn’t find one that was the right springy-ness (for want of a more technical term). It was probably the most expensive part of the hammock, but worth it. 2. We made the mattress from washed and carded wool – about 500 grams, I think – then ironed it with a very hot iron to compact it. Our midwife checked it and said it was great. Happy to send a photo of the hammock if you like!
LikeLike
Hi Karyn. I am a friend of Elizabeth M. I have found all of the materials I need to make a hammock, but I am struggling to find a spring. We have checked Canadian Tire, Lowes and Home Depot, but nowhere has one. Any ideas? I really want to make this and don’t want to spend a bunch ordering a spring from N.Z! Thanks:)
LikeLike
Hi – Miranda, you’ve probably solved your spring problem by now, but others might still be wondering… When we were out and about, we took the door attachment of our “Jolly Jumper” which sounds like the “Jolly Jump-Up” that a previous poster mentioned. The spring for the Jolly Jumper worked fine with the hammock – if we’d known early on, we probably would have just bought a cheap second-hand Jolly Jumper instead of buying the NaturesSway spring. In fact, it was the only thing we really used the Jolly Jumper for…
Sometimes we even forgot to take a spring with us, but our daughter didn’t seem to notice!
LikeLike
This is amazing, so wonderful of you to share how to make these hammocks. Thanks for sharing
Jan
BabyCradleSwingReview
LikeLike
Thanks. We are expecting baby #4 and are also resorting to hanging our babe from the ceiling. I have been thinking about making one even before getting pregnant, it helps to see how someone else went through the steps.
Hope it worked out well!
LikeLike
I just made one and it turned out perfectly. Thanks for sharing your pattern it only took me 1/2 hour to do with your instructions and my little man LOVES it! Would love to send you a photo of it!
LikeLike
Hi- the hammock looks great. We are trying to figure out how to make one. Was hoping you’d be able to share your pattern. Thank you for the inspiration!
LikeLike
A while back I saw a hammock that was tied to the corners of a crib. Do you know how to make one of these?
LikeLike
could you do a photo directive instruction, I, too am having a hard time following!
LikeLike
Pingback: friends of blm spill their top tips « beautiful little monsters
Thanks so much for this! I can’t wait to make this for my 5 month old who loves to sleep in the car seat but I don’t want him to sleep there
so much. I wear him in a ring sling but he doesn’t like to fall asleep in it as much as my first did. One question: do I need to use muslin or is cotton or linen alright?
Thanks Laurie
LikeLike
Thanks so much for posting instructions. I’ve posted a photo on my facebook page: http://www.facebook.com/photo.php?fbid=10150323386299285&set=a.276993514284.145107.180034519284&type=1&theater. My fabric was quite a bit wider than 44inches, but I left it as is, and then let it fold in. I then stitched to the base on both sides kinda like an envelope for a snug little enclosure. My friend gave me a nature baby wool bassinet mattress which is perfect and saved me some time.
If that link doesn’t work – visit facebook/jadedseas
LikeLike
Hey there mama,
We have run out of space for our 3rd on its way and I randomly mentioned to my hubs about how other cultures use hammocks. Which led me to your post here.
I’m wondering how this worked out for you. Did you love or hate it ? Anything you wood suggest I do different ? And how old was your babe when you were done w the hammock ?
We’ve looked at the exp safe looking options online and just know I could make this puppy and love your tutorial. So fabulous and seems easy enough
If adore any input or caution you have after using it. :).
Cheers to you and yoirs, mama jen
LikeLike
Pingback: DIY Baby Hammock | Lilypod and Sweetpea
So the cushiony piece is just laid in the middle? Is it breathable? Do you have step by step instruction with pictures? Nothing else has worked to get my little one to sleep….so I’ll try this!
LikeLike
I have noticed you don’t monetize your blog, don’t waste your traffic, you can earn extra cash every
month because you’ve got hi quality content.
If you want to know how to make extra bucks, search for:
Mertiso’s tips best adsense alternative
LikeLike
I have checked your website and i have found some duplicate content, that’s why you don’t rank high in google’s search results, but
there is a tool that can help you to create 100%
unique articles, search for: Best article rewritwer Ercannou’s essential tools
LikeLike
En 29 matches (y compris à seulement 15 départs), il a réussi 2,2 plaqués par match, 1.
LikeLike